SIPs installation: Wanaka House
It has been a long time since the initial blog on the SIPs house in Wanaka, so I thought I would continue the story and show the ease of the installation of the SIPs panels.

This first image shows the smaller individual SIPs panels that were small enough to bring to site by trailer. With fixings through the OSB sheathing into both sides of the bottom plate, these panels were very solid in themselves and didn’t really need the bracing.

All the large preassembled SIPs wall panels are delivered to site on a single load of a Hiab.

The panels are drilled to provide two balanced lifting points which makes positioning of panels easy for installation.

Before each panel is lowered into position, expanding foam is placed along the bottom plate to fill any voids between the bottom plate and the bottom of the rigid urethane insulation core of the SIPs panels.

Along with the expanding foam to the bottom plate, a bead of sealant is placed against adding panels to form an air seal between the panels. We did not rely on this air seal completely as every panel joint was sealed with Proclima Tescon Extoseal tape prior to adding any internal bates and linings.

Each panel was carefully aligned to be true and plumb prior to temporary fixing. Final fixing of panels to bottom plate and adding panels occurs when all panels are in place.

The hiab operator was quite familiar with the installation process. While the builders were checking for true and plumb panel alignment and temporarily fixing the panels, the hiab operator had another panel lined up and ready to be lowered into place.

The accuracy of the panels was outstanding, this panel simply slid into place and did not require any adjustment. Panels with raking heads also fitted together with a high level of accuracy.

Where walls were too large to be transported as one, individual sections could be spliced together on site. The Kingspan Tek system has a smaller piece or ‘splice’ of Sips panel that fits within the depth of the insulation core which is then fixed to the two adjoining Sips panels. This provides a very strong and easy connection but more importantly it provides a complete thermal barrier of urethane with no thermal bridging between inside and out.

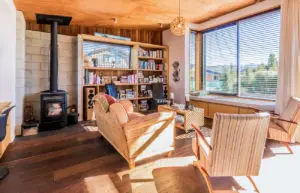
The house comes together very quickly and gives an immediate idea of how the windows and doors frame the various views. Structure, insulation and sheathing all in one.

The installation of these panels took a single afternoon. The following day all panels were checked and adjusted where needed prior to final fixing.

Following this timber framed elements were added. This included framing for items such as bay windows, roof beams, internal walls and the addition of a continuous top plate.

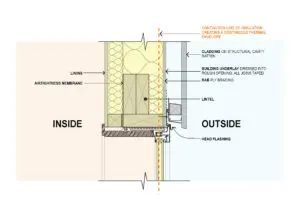
With the addition of framing, we had to start thinking about achieving a complete air tight environment. Because of the low pitch of the roof we opted for a traditional timber framed structure. Any external timber framing achieved air tightness by the addition of an Proclima ‘Intello’ humidity variable moisture control layer. Here you can see a section of Proclima Intel Plus connection strip which will run over the top of all internal timber walls.

The SIPs panels are easier to seal. The builders drill holes around all panel connections and inject expanding foam to fill any air gaps. Then these holes and holes for any lifting eyes are taped with Proclima Tescon tape as per the photo above. All joints between panels (in line or at corners) are also tapped to ensure an airtight seal. In the above photo you can see that the lintels were held back from the external face so that when the top plate is installed the entire lintel can be covered with a layer of high grade insulation minimising thermal bridging across the face of the lintel.

With the addition of plywood box beams, lintels and verandah posts the bones of the house are complete. The area of external timber framing is a storeroom that adjoins the triple carport. Electrical services are bought into the building at this point and with the reduced need for insulation to this room, timber framing became an option.
Completed SIPs home:
View the completed ‘Albert Town Courtyard House’ in our portfolio.